"having FOMO" due to daily release to new AI models follow along and get through your first LLM call Python is the programming language we'll use to talk to the AI. -> Go to: link -> Scroll to the bottom of the page -> Click "Windows i...
"having FOMO" due to daily release to new AI models
follow along and get through your first LLM call
Step 1: Install Python 3.11
Python is the programming language we'll use to talk to the AI.
-> Go to: link
-> Scroll to the bottom of the page
-> Click "Windows installer (64-bit)"
-> Run the installer and click "Install" (make sure to check "Add Python to -PATH" if asked)
-> Verify installation: Open Command Prompt and type:
python --version
Step 2:Install VS code(it is a code editor)
-> if you don't have vs code installed , download it from link
-> Watch a quick youtube tutorial if you are new to it.
Step 3:Create GITHUB account
-> Go to link
-> Sign up with your email
-> Choose a username and password
step 4:INSTALL GIT
-> Go to: link
-> The download should start automatically
-> Run the installer and click "Next" through all the default options
-> Verify installation: Open Command Prompt and type: git --version
-> Set your identity , open git and type:
git config --global user.name "YOUR_NAME"
git config --global user.email "your@email.com"
step 5:Install uv(lightning fast python package manager)
-> Open PowerShell, run:
powershell -ExecutionPolicy ByPass -c "irm https://astral.sh/uv/install.ps1 | iex"
-> If blocked, first run: Set-ExecutionPolicy RemoteSigned -Scope CurrentUser
-> Close PowerShell, open new PowerShell window
-> Verify by this command : uv --version
step 6:YOUR FREE GROQ API
-> Go to link
-> Sign up with your google account
-> Click "API Keys" in sidebar
-> Click "Create API Key", name it "your_name"
-> IMP::COPY THE KEY (starts with gsk_...) - you cannot see it again
Step 7: Create Your Project Folder & Store API Key
-> Create a new folder on your desktop named "AI"
-> Inside your AI folder , create a new file names .env
-> open .env in notepad and paste this:
GROQ_API_KEY="gsk_your_actual_api_key"
-> save it.
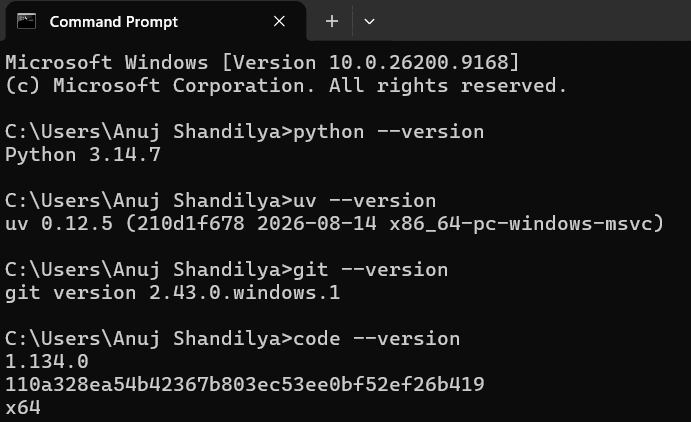
VERIFY ABOVE STEPS
-> open Command Prompt and run these commands one by one, if any of these give any error go through the installation again
Step 8: Set Up Your Project in VS Code
-> open VS code
-> Press Ctrl + K then Ctrl + O (that's Ctrl+K followed by Ctrl+O)
-> Select the "AI" folder you created
-> Press Ctrl + Shift + ` (backtick) to open a terminal inside VS Code
-> In the terminal, run these commands one by one:
uv init day1
cd day1
uv venv --python 3.11
.venv\Scripts\activate.ps1
-> You'll see (day1) appear in brackets before your terminal path
Step 9:Write this command to open code llm_Call.py
-> In the VS Code terminal , create a new file:
code llm_call.py
-> This opens a new file.Copy and paste this exact code:
import os
from pathlib import Path
from dotenv import load_dotenv
from groq import Groq
load_dotenv()
my_api_key = os.getenv("GROQ_API_KEY")
if not my_api_key:
raise ValueError("GROQ_API_KEY environment variable is not set.")
client = Groq(api_key=my_api_key)
model = "openai/gpt-oss-120b"
role = "user"
content = "Do you know VIRAT KOHLI | RONALDO?"
message = {
"role": role,
"content": content
}
messages = [message]
response = client.chat.completions.create(
model=model,
messages=messages
)
print(response)
print("################################################")
answer = response.choices[0].message.content
print(answer)
-> Save the file
Step 10:Install Dependencies and run your code
-> In the VS Code terminal, install the required packages:
uv add groq python-dotenv
-> Aha,run your first LLM call
python llm_call.py
-----------------------------ANUJ SHANDILYA--------------------------